
Locations, assets and points can be added, edited and deleted in the GreaseBoss Mobile App. Changes are saved on the device and sent to GreaseCloud when the app syncs. This is useful for small changes in the field, such as adding a point that was missed during setup or correcting a point name.
Larger changes, such as setting up a whole site, are easier in the GreaseCloud Dashboard. See 1. Configure Grease Points in the Dashboard.
In this article:
- Add a Location, Asset or Point
- Edit a Location, Asset or Point
- Point Fields
- Delete a Location, Asset or Point
- What the App Can't Set
Add a Location, Asset or Point
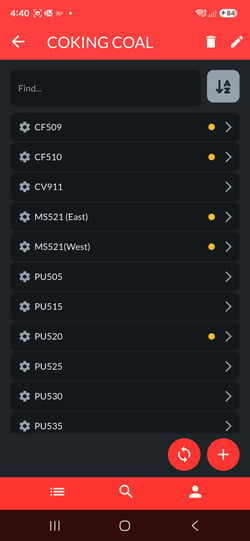
The app follows the same structure as the GreaseCloud account: Location → Asset → Point. A location can also hold sub-locations, and an asset can hold sub-assets.
The + button adds an item to the screen you're on.
- Add a location: on the home screen, tap +. The Add Location panel opens. Enter a Name (required) and any Notes, then tap Save.
- Add an asset or sub-location: open the location and tap +. Choose Asset or Sub-Location, enter a Name (required) and any Notes, then tap Save.
- Add a point or sub-asset: open the asset and tap +. Choose Point or Sub-Asset.
- For a point, enter a Name and choose a Type (both required), fill in the other point fields (see Point Fields below), then tap Save.
- For a sub-asset, enter a Name (required) and any Notes, then tap Save.
- Sync (the round button with two arrows) to send the new items to GreaseCloud.
A new point has no schedule or requirement yet. See What the App Can't Set below.
Edit a Location, Asset or Point
- Location or asset: open it and tap the pencil icon at the top of the screen. Change the name or notes, then save.
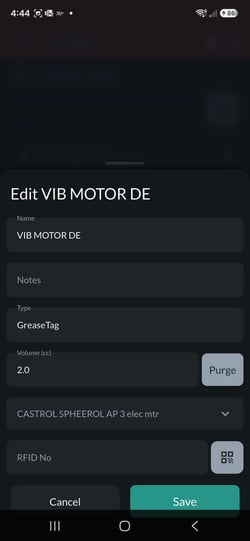
- Point: open the asset and tap the point. The Edit panel opens. Change the fields, then tap Save.
- Sync to send the changes to GreaseCloud.
Point Fields
| FIELD | WHAT IT'S FOR |
|---|---|
| Name | The point name. For Grease Tag points, this is what the operator sees on the Head Unit screen, so use a name that's easy to recognise at the machine, such as "Head DS" or "Drive End Bearing" |
| Notes | Anything useful about the point, such as access instructions |
| Type | GreaseTag for a Grease Tag point, or Endpoint for an Endpoint point |
| Volume (cc) (Grease Tag points only) | The amount of grease required each time the point is greased |
| Purge (Grease Tag points only) | Sets the volume requirement to purge, for points where the volume isn't known or the point is greased until old grease purges |
| Consumable (Grease Tag points only) | The grease the point needs, chosen from the list |
| RFID No (Grease Tag points) | The tag's RFID number. See GreaseBoss Mobile App - Map Grease Tags |
| Serial number (Endpoint points) | The Endpoint mapped to the point. See GreaseBoss Mobile App - Map Endpoints |
Delete a Location, Asset or Point
Each location, asset and point has a bin icon. Tap it, then confirm to delete.
- Deleting a location also deletes all its assets and their points.
- Deleting an asset also deletes all its points.
- Deleting a point deletes that point only.
Once the app syncs, the deleted items and all their data are removed from the GreaseCloud Dashboard. Check you have the right item before confirming.
Deleted something by mistake? Contact support@greaseboss.com.au as soon as possible. Deleted items can usually be restored.
What the App Can't Set
Some settings can only be made in the GreaseCloud Dashboard. After adding a point in the app, set these in the Dashboard:
- Grease Tag points need a schedule. A point that isn't on a schedule shows No task found on the Head Unit, even when its tag is mapped.
- Endpoint points need a requirement, which sets how much grease should be delivered and how often. The volume and consumable for an Endpoint point can't be set in the app. See Operational Guide - 4. Understanding Alerts.