Before installing any Grease Tags or hardware in the field, all grease points should be configured within the GreaseCloud dashboard. This establishes the digital structure of the lubrication program and ensures grease points are available for future tag mapping, event recording, route management, and reporting.
Proper configuration at this stage significantly reduces commissioning time and ensures lubrication activities are accurately recorded against the correct assets and grease points.
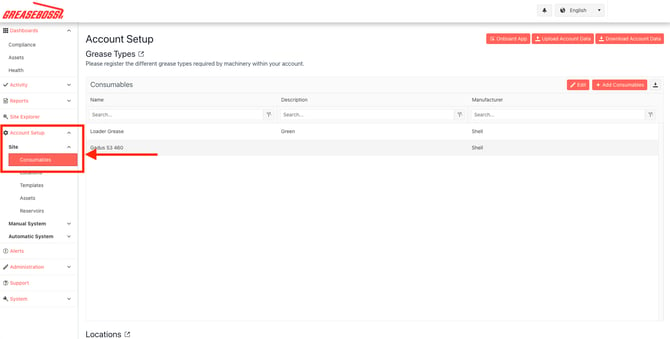
For new GreaseCloud implementations, the quickest method of creating grease points is to complete the Account Upload Template and import the data into the system.
Contents (Click below to skip through):
Step 1 - Audit Existing Grease Points
Step 2 – Download the Account Upload Template
Step 3 – Populate the Account Upload Template
Step 7 – Final Verification and Installation Readiness
Prerequisites
Before commencing configuration, ensure you have:
- Access to the GreaseCloud dashboard.
- A valid user account with appropriate permissions.
- Knowledge of the site’s lubrication program.
- Existing lubrication schedules, route sheets, or maintenance records (if available).
- Details of all assets, grease points, grease types, volumes, and lubrication frequencies.
If you do not have access to the GreaseCloud dashboard, contact your System Administrator. If additional assistance is required, your System Administrator can contact GreaseBoss Support.
Step 1 – Audit Existing Grease Points
Conduct an audit of all grease points that will be monitored within the GreaseCloud system.
Many sites already maintain lubrication schedules, maintenance plans, route sheets, or equipment records that identify lubrication points. These documents can often be used as the basis for collecting the information required for import.
For each grease point, record the following information:
Asset Hierarchy Information
- Location
- Asset
Grease Point Information
- Point Name
- Consumable (Grease Type)
- Volume Required (g/cc)
- Schedule Name
- Schedule Frequency
- Route Order (optional)
- Notes (optional)
Example
|
Location |
Asset |
Point Name |
Consumable |
Volume Required (g/cc) |
Schedule Frequency |
|
Main Floor |
CV001 |
Head DS |
Superlube EP2 |
25 |
Weekly |
Identifying Purge Grease Points
During the grease point audit, determine whether each grease point has a known lubrication volume or should be managed as a Purge Point.
A Purge Point is a lubrication point where:
- The required grease volume is unknown.
- The volume applied varies significantly between lubrication events.
- The lubrication procedure requires grease to be applied until old grease is purged from the bearing or component.
- Operators regularly grease until clean grease is observed rather than applying a fixed quantity.
For these grease points, enter -1 as the Volume Required (g/cc) value.
Example
|
Location |
Asset |
Point Name |
Consumable |
Volume Required (g/cc) |
Schedule Frequency |
|
Main Floor |
CV001 |
Head DS |
Superlube EP2 |
-1 |
Weekly |
When a grease point is configured with a volume of -1, GreaseCloud automatically treats the point as a Purge Point.
For compliance calculations:
- Any grease delivery greater than 0 g/cc will be considered compliant.
- The actual volume delivered is still recorded.
- Operators can continue lubricating until purge is achieved without needing to meet a predefined target volume.
This configuration is particularly useful when:
- The correct lubrication volume has not yet been established.
- Existing lubrication procedures specify “grease until purge”.
- Different operators may apply slightly different volumes to achieve an acceptable purge result.
- The required volume changes over time due to operating conditions or equipment wear.
Note: When using the Account Upload Template, enter -1 directly into the Volume Required (g/cc) field. The same value can also be entered when manually creating or editing grease points within the GreaseCloud dashboard.
Naming Convention Guidelines
Before creating grease points, establish consistent naming conventions.
Consistent naming improves:
- Reporting accuracy.
- Operator usability.
- Route management.
- Asset identification.
- Long-term system maintenance.
Grease point names should:
- Clearly identify the physical lubrication point.
- Match the location where the Grease Tag will be installed.
- Be easily understood by lubrication operators.
- Remain consistent across similar equipment.
Examples
Good examples:
- Head DS
- Head NDS
- Drive End Bearing
- Tail Bearing
- Take-Up Bearing
Poor examples:
- Point 1
- Bearing
- Grease Point
- Random abbreviations that operators may not understand
The grease point name configured in GreaseCloud becomes the name operators will see when performing lubrication activities and viewing historical records.
Step 2 – Download the Account Upload Template
GreaseCloud supports bulk creation of Locations, Assets, Grease Points, Schedules, and Consumables using an Excel import template.
Using the template is the fastest and most efficient way to populate a new account.
To download the template:
1. Log into the GreaseCloud dashboard.
3. Select Upload Account Data.
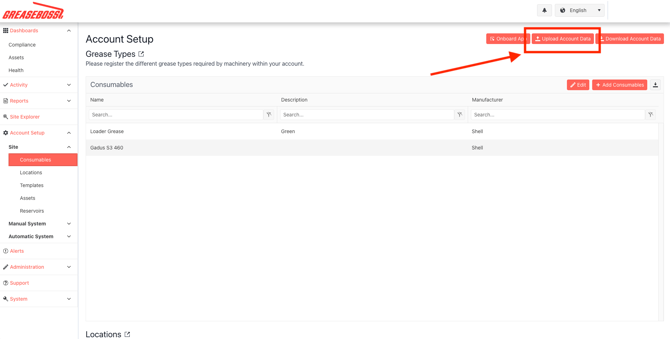
4. Download the desired template.
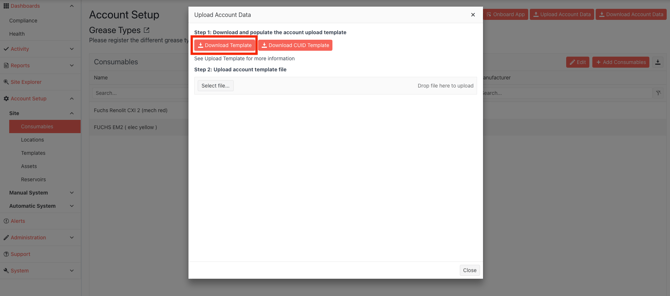
Available Templates
GreaseCloud provides two account upload templates:
- Standard Account Upload Template
- CUID Account Upload Template
Which Template Should I Use?
For most implementations, use the Standard Account Upload Template.
The standard template contains fields required to create:
- Locations
- Assets
- Grease Points
- Consumables
- Lubrication Schedules
What is a CUID?
A CUID (Collision-resistant Unique Identifier) is a unique identifier used to link GreaseCloud records with external systems.
Examples include:
- CMMS platforms
- ERP systems
- Asset management systems
- Existing customer asset databases
The CUID template contains additional fields such as:
- Location CUID
- Asset CUID
- Point CUID
- Consumable CUID
These identifiers allow records within GreaseCloud to maintain relationships with records stored in external business systems.
When Should the CUID Template Be Used?
The CUID template should only be used when:
- Existing unique identifiers already exist within customer systems.
- Integration requirements have been identified.
- GreaseBoss has specifically recommended its use.
For most customers, the additional fields are unnecessary and add complexity to the setup process.
Recommendation: Unless otherwise advised by GreaseBoss, use the Standard Account Upload Template.
Step 3 – Populate the Account Upload Template
Open the downloaded Excel template and populate it with the information collected during the grease point audit.
Important Requirements
Before editing the template:
- Save the file in Microsoft Excel format (.xlsx).
- Do not rename, delete, rearrange, or modify column headings.
- Do not convert the file to CSV format.
- Ensure all mandatory information is entered before upload.
The import process relies on the supplied column structure. Changes to the column headings may prevent successful import.
Template Fields
The standard template includes the following fields:
|
Field |
Description |
|
Location |
Physical location or operating area |
|
Asset |
Machine or asset name |
|
Point Name |
Grease point name |
|
Consumable |
Grease or lubricant required |
|
Volume Required (g/cc) |
Quantity delivered per lubrication event |
|
Schedule Name |
Name of the lubrication schedule |
|
Schedule Frequency |
Frequency of lubrication |
|
Route Order |
Optional route sequence |
|
RFID |
Optional RFID identifier |
|
Notes |
Optional comments |
|
Point Id |
Internal use only |
Field Guidance
Location: The physical area where the asset is located.
Examples:
- Main Floor
- Crusher Area
- Packaging Line
- Workshop
Asset: The machine or equipment requiring lubrication.
Examples:
- CV001
- Crusher 01
- FAN003
- Pump Station 2
Point Name: The specific lubrication point on the asset.
Examples:
- Head DS
- Head NDS
- Drive End
- Tail Bearing
Consumable: The lubricant required for that grease point.
Examples:
- Superlube EP2
- Lithium EP2
- Synthetic Bearing Grease
Volume Required (g/cc): The quantity of grease that should be delivered during each lubrication event.
GreaseCloud records grease delivery in grams (g) or cubic centimetres (cc). For most grease applications these values are considered equivalent and may be used interchangeably.
Examples:
- 10
- 25
- 50
- -1
Purge Points
If a grease point should operate as a Purge Point, enter -1 as the volume.
When a grease point is configured with a volume of -1:
- GreaseCloud automatically treats the point as a purge point.
- Any delivered volume greater than 0 g/cc will be considered compliant.
- The actual delivered volume is still recorded for reporting and historical purposes.
This is commonly used when:
- The correct lubrication volume is unknown.
- Operators grease until purge is achieved.
- The required grease quantity varies between lubrication events.
The value -1 can be entered directly into the Account Upload Template or configured manually within the GreaseCloud dashboard.
Schedule Name: The descriptive name of the lubrication schedule.
Examples:
- Weekly Lubrication
- Monthly Route
- Crusher PM Schedule
The Schedule Name is displayed within GreaseCloud and assists operators in identifying lubrication tasks.
Schedule Frequency: Defines how often lubrication activities occur.
Examples:
- Daily
- Weekly
- Fortnightly
- Monthly
- Quarterly
Route Order: Optional field used to control the order grease points appear during lubrication routes.
Examples:
- 1
- 2
- 3
Using route order can improve efficiency by guiding operators through the most logical lubrication path.
RFID: Optional field.
This can typically be left blanks. RFID values are typically assigned during the installation and commissioning phase after physical Grease Tags have been installed.
Notes: Optional field for additional information relating to the grease point.
Examples:
- Access via platform
- Requires lockout
- Use extension hose
Point Id: Internal system field.
This field should not normally be modified by users.
Step 4 – Review the Data
Before uploading the template, perform a quality review.
Verify:
- All grease points have been entered.
- Naming conventions are consistent.
- Correct consumables have been assigned.
- Volumes are accurate.
- Schedule names are consistent.
- Schedule frequencies are correct.
- Duplicate entries have been removed.
Correcting issues before import reduces rework later during commissioning.
Step 5 – Upload the Template
Once the template has been completed and reviewed:
- Save the spreadsheet.
- Confirm it remains in .xlsx format.
- Navigate to Account Setup → Upload Account Data.
- Select the completed spreadsheet.
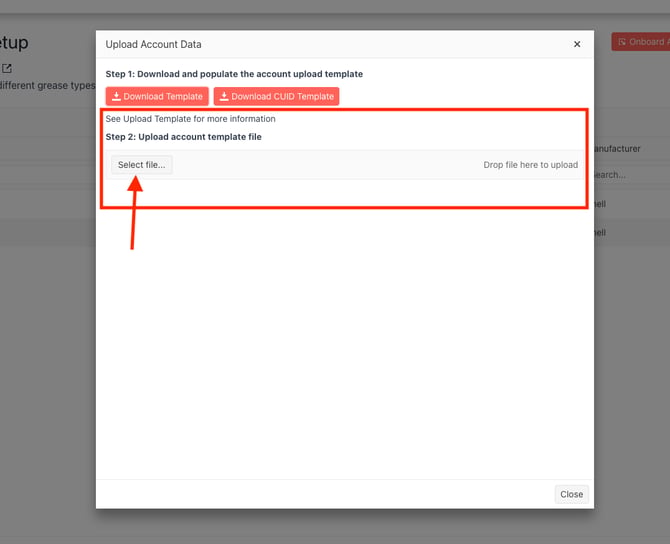
- Upload the file.
- Allow the import process to complete.
For larger imports, processing may take several minutes.
If assistance is required, the completed template can be provided to GreaseBoss Support, who can assist with importing the data into the account.
Step 6 – Verify Imported Data
After the import has completed, verify that all information has been created correctly.
Navigate to Account Setup → Manual System → Grease Tags
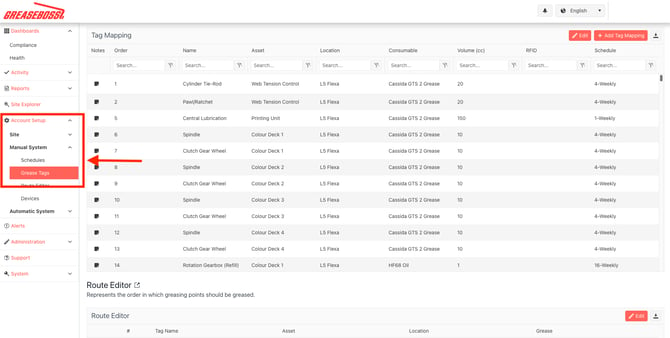
Review:
- Locations
- Assets
- Grease Points
- Consumables
- Volumes
- Schedules
- Route Orders
Check for:
- Missing grease points.
- Duplicate entries.
- Incorrect asset assignments.
- Incorrect schedule frequencies.
- Incorrect consumables.
- Naming inconsistencies.
Any discrepancies should be corrected before proceeding to installation.
Step 7 – Final Verification and Installation Readiness
Once grease points have been successfully imported, the GreaseCloud account should be reviewed to ensure it is ready for the Grease Tag installation and commissioning phase.
Verify that:
- All Locations have been created correctly.
- All Assets have been created correctly.
- All Grease Points have been imported.
- Consumables have been assigned correctly.
- Volumes are accurate.
- Purge points have been configured using a value of -1 where required.
- Schedule Names and Schedule Frequencies are correct.
- Naming conventions are consistent across the account.
- Route Order values have been configured where required.
Perform a final review with site personnel or lubrication subject matter experts to confirm the imported data accurately reflects the site’s lubrication program.
Any corrections should be made before commencing Grease Tag installation.
Once verified, the GreaseCloud account is ready for the hardware installation and tag commissioning phase.
Completion
Once grease points have been imported, reviewed, and verified, the GreaseCloud account is ready for the next stage of deployment.
At this point:
- Locations have been configured.
- Assets have been configured.
- Grease Points have been created.
- Consumables have been assigned.
- Lubrication schedules have been configured.
- Route sequencing has been established where required.
- Purge points have been configured where applicable.
The account is now prepared for the Grease Tag installation and commissioning process.
For additional information regarding dashboard configuration, user management, and advanced setup options, refer to the Dashboard Configuration Guide.