
Applies to: GreaseBoss Grease Tags — Snap On (Zerk), Button Head V-Tag and Washer Style — read by a Head Unit HU20.
Scope: The Grease Tag and the tag read. Not the machine being greased — a blocked nipple or a packed bearing is for your site maintenance team. If no tag reads anywhere on the Head Unit, that is a Head Unit fault, not a tag fault.
How it works: Snap Fit (Zerk) Grease Tags – Overview and Manual System – GreaseBoss Head Unit (HU20).
DIAGNOSTIC STEPS
Step 1 — Start here
|
Go to |
What you're seeing |
|
Nothing happens at the point — no point name on screen, no blue LED |
|
|
Reads on some attempts and not others, or only when the gun is held a certain way |
|
|
Part C — Reads, but the wrong point or the wrong grease is shown |
Wrong point name, "Wrong Grease", or a QR code and RFID number |
|
The round was done, but GreaseCloud has the grease against an unknown point |
|
|
The tag is cracked, loose, gone, or doesn't suit the fitting |
|
|
Not a Grease Tag fault — Head Unit |
No tag reads anywhere, screen blank, or "Asleep" on screen. See Head Unit Troubleshooting |
|
The tag reads and the point is on screen, but the point won't take grease. Refer to your maintenance team |
|
|
|
PART A — TAG WON'T READ AT ALL
What you're seeing: you attach the Head Unit at a tagged grease point and nothing happens — no point name on the screen and no blue LED.
The RFID reader sits in the Head Unit handle. The metal wand and the fitting on its end extend the reader's antenna when they make full metal contact with the nipple — so grip, seating and the tag's own mounting are all part of the read path.
Step A1 — Rule out the Head Unit
Do this first. One tag failing on a working Head Unit is a tag fault; one Head Unit failing on every tag is not.
- Press either button to wake the unit. A Head Unit showing "Asleep" or "Press button to start" will not read tags.
- Screen blank → flat battery. See Head Unit Troubleshooting.
- Try the same Head Unit at two or three other tagged points.
- Reads elsewhere → the Head Unit is working. Go to Step A2.
- Reads nowhere → Head Unit fault. Go to Head Unit Troubleshooting.
- Where a second Head Unit is available, try it at this point.
- The second unit reads → the first Head Unit is at fault.
Step A2 — Check how the gun is being held
The most common cause. A hand wrapped over the metal wand or dog leg interferes with the antenna.
- Hold the nozzle by the handle only.
- Attach the fitting to the nipple first.
- Hands off all metal — wand, dog leg, coupler or applicator, extensions.
- Don't rest a thumb on a quick-release latch.
- Wait for the point name and blue LED before pumping grease.
- Reads → resolved. Brief the crew on the technique.
- The Head Unit will not scan with a hand holding onto the wand or coupler/fitting. Do not hold the wand or coupler/fitting as per below:
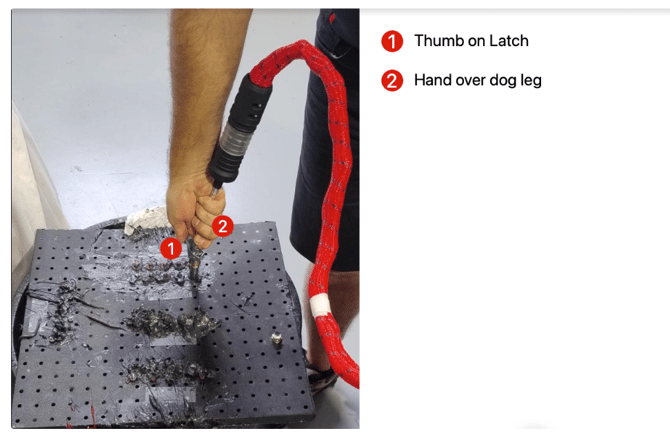
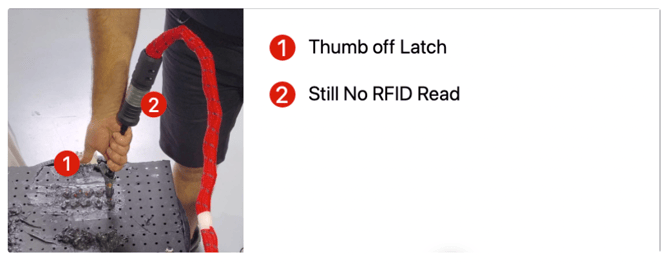
- The Head Unit will only read the tag with the hand clear of the wand or coupler fitting: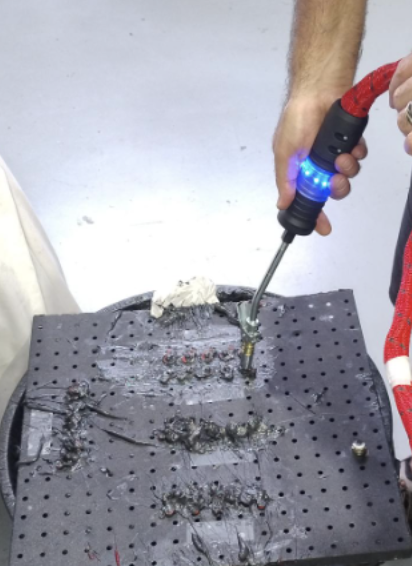
Step A3 — Check the fitting is seated on the nipple
The wand and fitting earth through the nipple, so partial contact breaks the read path.
- Fully engaged and square on the nipple — not part-way on, not at an angle.
- The fitting suits the nipple at that point: a Zerk coupler on a Zerk nipple, a button head applicator on a button head.
- Both clear of packed grease, paint, corrosion and damage.
- Check the nipple is tight in its housing. A loose nipple breaks the earth path.
- Reads once seated → resolved.
Step A4 — Direct-read test
Separates a dead reader from a broken antenna path.
- Bring the base of the handle, where the wand exits, up against the tag.
- Reads → the reader works. The fault is the antenna path (Step A3) or the tag (Step A5).
- Doesn't read here, but reads at other points → the tag. Go to Step A5.
Step A5 — Check the tag and its mounting
- Wipe grease and dirt off the face of the tag, then retry.
- Snap On: rotate the tag on the nipple. A small change in position is often enough.
- Button Head V-Tag: confirm it is still stuck flat at the base of the point, and lines up with the applicator when it is fitted.
- Washer Style: confirm it is fitted under the nipple, hexagonal face outwards. Moving it around under the nipple can bring metal close enough behind it to read.
- The tag needs metal close behind it. A tag with an air gap or a non-metallic backing may never read reliably.
- Check for cracks, deformation or crushing, and that the small black RFID chip is still in the tag — on a Zerk snap tag it can fall out of the plastic body. Damaged, or the chip missing → go to Part E.
- Reads after adjustment → resolved.
- Still nothing, and the Head Unit reads at other points → replace the tag. Go to Part E.
Step A6 — Confirm resolution
- Read the point: the point name appears on screen with the blue LED.
- Grease the point as normal.
- Allow 10–20 minutes after the Head Unit's next sync, then confirm the greasing shows against the named point in GreaseCloud.
PART B — TAG READS ONLY SOMETIMES
What you're seeing: the same point reads on some attempts and not others, or only reads when the gun is held a certain way.
An intermittent read is a marginal antenna path — enough contact or clearance to read sometimes, not always.
Step B1 — Rule out hand position
- Read the point twice with hands off all metal, then twice with a hand over the wand or dog leg.
- Reads consistently hands-off, fails with the hand on → hand position, not a tag fault. Resolved. Brief the crew on the technique in Step A2.
Step B2 — Check the fitting and nipple contact
- Clean grease build-up off both the fitting face and the nipple.
- Check the coupler or applicator for wear, damage or a loose fit on the nipple.
- Check the wand is straight and its joints are tight.
- Check the nipple is tight in its housing.
- Reads consistently after cleaning or replacing the fitting → resolved.
Step B3 — Check the tag's face and position
- Wipe dirt, debris and grease off the face of the tag. On a stick-on tag this is the most likely cause.
- Snap On: rotate the tag on the Zerk nipple. A small change in position often fixes it.
- Button Head V-Tag: check the wand lines up square over the tag when the applicator is on the nipple — see Button Head V-Tags – Installation Guide for the intended position.
- Washer Style: move the tag around under the nipple. A small change in position can also bring metal close enough behind it to read.
- Reads consistently after cleaning or repositioning → resolved.
Step B4 — Check for interference at the point
- Read two or three other points to confirm the problem is local to this one.
- A neighbouring tag reads instead, or the two alternate → cross-reading. Go to Part C, Step C3.
- Check whether the tag sits deep in a steel pocket or hard against a large structure, which cuts read range.
- Relocating the tag is possible → move it clear and remap the point. See Part E.
Step B5 — Confirm resolution
- Read the point five times in a row, hands off all metal. Five reads out of five is fixed.
- Still intermittent → replace the tag (Part E).
- Still intermittent after replacement → go to "Still not working".
PART C — READS, BUT THE WRONG POINT OR THE WRONG GREASE IS DISPLAYED
What you're seeing: a read happens, but the screen shows a different grease point, the wrong grease, or a QR code and an RFID number instead of a point name.
The tag carries only its unique 24-digit RFID code. The point name, the grease and the schedule all come from the mapping held in GreaseCloud, and the Head Unit only has them once it has synced — so everything in this Part is a mapping, sync or cross-read problem, not a tag fault.
Step C1 — Check the Head Unit has synced since the tags were mapped
Do this first. Tags are mapped in GreaseCloud, and the Head Unit only gets the point names, grease and schedules when it syncs. A unit that hasn't synced since the mapping was done is working from old data, and that alone explains most of what follows.
- Go to Dashboards > Health > Head Units and find the serial number.
- Read Last Activity, not the Online dot — the 7-day timeout means Online doesn't mean recent.
- Last Activity is older than the mapping work → sync the unit and read the point again before going any further. See Head Unit Troubleshooting if it won't sync.
- Reads correctly after the sync → resolved.
- Synced since the mapping and still wrong → continue to Step C2.
Step C2 — QR code and RFID number on screen
- The Head Unit shows a QR code and the tag's RFID number when the tag isn't mapped to a grease point.
- Map it in the GreaseBoss mobile app — see GreaseBoss Application – Walkthrough and mapping Tags.
- A new tag fitted to replace a lost one → see Replace a lost tag.
- Sync the Head Unit before the next round, or it will keep showing the tag as unmapped.
Step C3 — Wrong point name displayed
- Check whether the name shown belongs to a neighbouring point.
- Yes — a nearby point → cross-reading. Two tags are close enough that the reader picks up the wrong one.
- Confirm it with the direct-read test (Step A4) at each tag in turn.
- Increase the separation between the tags. Fit replacements as far apart as the points allow — see the installation guide for the tag type.
- Where the tags can't be separated, read and grease the points one at a time, hands well clear of all metal.
- No — an unrelated point → mapping error. The RFID code is recorded against the wrong point in GreaseCloud. Correct it in the mobile app.
- Two points showing each other's names → the tags have been swapped. Either they were mapped to each other's points, or the tags themselves were moved between the points at some stage. Confirm which tag is now at which point with the direct-read test, then remap both to match what is fitted.
Step C4 — "Wrong Grease" displayed
The Head Unit shows this when the grease assigned to that grease point doesn't match the grease assigned to the Head Unit. Both are set in GreaseCloud.
- Stop. Tell your supervisor if any grease has already gone in.
- Check the grease assigned to the Head Unit: Dashboards > Health > Head Units > serial number > Consumable.
- Check the grease assigned to the grease point / Grease Tag in GreaseCloud.
- They don't match → site admin corrects whichever one is wrong.
- They match → go to "Still not working".
Note: the Head Unit can't tell what grease is in the gun — it only knows what is assigned to it in GreaseCloud. Confirm the gun holds the grease the point calls for before you grease.
Step C5 — Confirm resolution
- Sync the Head Unit, then read the point again.
- Confirm the correct point name and grease appear on screen.
- Allow 10–20 minutes after the next sync, then confirm the record in GreaseCloud.
PART D — RECORDED AS UNTRACKED OR 00000000000000
What you're seeing: the round was done, but GreaseCloud shows the grease against "00000000000000", an unknown point, or UNTRACKED GREASING.
GreaseCloud records this when grease was delivered without a matched tag read — either no tag was read, or the tag read isn't mapped to a point. Nothing appears on the Head Unit to say so at the time.
Step D1 — Rule out greasing outside the system
- Check with the lube tech. Equipment greased that has no GreaseBoss tags fitted is recorded this way. Expected — no fault.
- Confirm the points in question are mapped points with tags fitted.
Step D2 — Check the point still has a tag
- Walk the point and look.
- Missing, or clearly damaged → go to Part E.
Step D3 — Check the read technique
- The most common cause at a tagged point is pumping before the read.
- Attach the fitting, wait for the point name and blue LED, then pump.
- Hands off all metal while waiting for the read (Step A2).
Step D4 — Test the point
- Read the point with the Head Unit and watch the screen.
- Point name appears → the tag reads. The cause was technique or a missed read. Confirm at the next round.
- QR code and RFID number → the tag isn't mapped. Go to Part C.
- Nothing → go to Part A.
Step D5 — Confirm resolution
- After the next round and sync, confirm the greasing lands against the named point in GreaseCloud.
- Records already logged as untracked are a data question for your site admin or GreaseBoss Support.
PART E — TAG DAMAGED, MISSING, OR THE WRONG TYPE FITTED
What you're seeing: the tag is cracked, loose, missing from the point, or the type fitted doesn't suit the fitting.
Grease Tags are fully passive — no battery, no button, no indicator. A cracked or deformed tag may not retain on the fitting and will not read reliably.
Step E1 — Confirm the right tag type for the fitting
- Zerk nipple → Snap On, clipped over the head of the nipple.
- Button head nipple → Button Head V-Tag, adhered to the asset beside the point and aligned so the button head applicator sits over it.
- Washer Style → fitted under the nipple like a washer, over the fitting threads, hexagonal face outwards.
- Wrong type fitted → replace with the correct type for the fitting. See the installation guides under RELATED ARTICLES.
Step E2 — Assess the tag
- Clean the face and retry before replacing — heavy grease build-up alone can stop a read.
- Cracked, deformed, crushed or melted → replace. Don't refit a damaged tag.
- Snap On: check the small black RFID chip is still seated in the plastic body. It can fall out, and the tag will not read without it. Chip missing → replace the tag.
- Snap On: lift the tag gently. A loose tag still reads, but one that moves freely will be lost off the nipple. Replace it.
- Button Head V-Tag: edges lifting or the tag sliding → replace and redo the surface preparation.
- Washer Style: damaged or distorted → replace at the next opportunity to break the nipple.
Note: Grease Tags scan between −40 °C and 85 °C. A point running hotter than that may not read until it cools, which is expected rather than a tag fault.
Step E3 — Replace the tag
- Fit the replacement per the installation guide for that type. Clean the fitting or surface first — V-Tags need a solvent clean, then isopropyl alcohol, then firm pressure for at least 10 seconds.
- Keep the new tag as far as practical from neighbouring tags, to avoid cross-reading.
- Scan the new tag with the Head Unit. It reads as unknown and displays a QR code.
- Map it to the point in the GreaseBoss mobile app — see Replace a lost tag.
- Sync the Head Unit before the next round.
Step E4 — Confirm resolution
- Read the point: the correct point name appears with the blue LED.
- Confirm the new RFID code against the point in the GreaseCloud grease tag table.
- Grease the point, and confirm the record in GreaseCloud after the next sync.
SYMPTOM / LIKELY CAUSE / SUGGESTED ACTION
|
Symptom |
Likely Cause |
Suggested Action |
|
No tag reads anywhere on this Head Unit |
Head Unit fault, not a tag fault |
Go to Head Unit Troubleshooting (A1) |
|
"Asleep" or "Press button to start" on screen |
Unit in sleep mode — it won't read tags |
Press either button to wake it, then read again (A1) |
|
Won't read, hand wrapped over the wand or dog leg |
Hand interfering with the antenna |
Hold by the handle only, hands off all metal, wait for the read (A2) |
|
Won't read, fitting not fully on the nipple |
Broken earth path — the wand and fitting extend the antenna |
Seat the fitting square and fully engaged (A3) |
|
Won't read since a coupler, applicator or nipple was changed |
The fitting no longer seats squarely on the nipple |
Confirm the fitting suits the nipple fitted at that point (A3) |
|
Won't read at one point only, other points fine |
Tag position, backing or damage |
Rotate or reseat the tag; check for metal behind it (A5) |
|
Won't read, and the direct-read test at the handle base fails |
The tag |
Replace the tag (Part E) |
|
Won't read, tag looks intact |
The RFID chip has fallen out of the plastic body |
Check the chip is still in the tag; replace if it is gone (E2) |
|
Reads on some attempts, not others |
Marginal antenna path |
Work through Part B before replacing the tag |
|
Stick-on tag reads only sometimes |
Dirt or debris over the tag face, or the wand not aligned over the tag |
Clean the face and check the wand position (B3) |
|
Snap On tag moves freely on the nipple |
Retention lost — it still reads, but it will be lost off the machine |
Replace the tag (E2) |
|
V-Tag edges lifting |
Adhesive failing, usually poor surface preparation |
Replace and redo the surface prep (E2, E3) |
|
Reads only when cool, fails on a hot point |
Above the −40 °C to 85 °C scanning range |
Expected. Read the point once it has cooled |
|
Point name, grease or schedule wrong right after tags were mapped |
The Head Unit hasn't synced since the mapping was done |
Check Last Activity, sync the unit, read the point again (C1) |
|
QR code and RFID number on screen |
The tag isn't mapped to a grease point |
Map it in the GreaseBoss mobile app (C2) |
|
A neighbouring point's name is displayed |
Cross-reading between two tags too close together |
Separate the tags; read the points one at a time in the meantime (C3) |
|
An unrelated point's name is displayed |
The RFID code is mapped to the wrong point |
Correct the mapping in the mobile app (C3) |
|
Two points showing each other's names |
Mapped to each other's points, or the tags were swapped over on the machine |
Confirm which tag is at which point, then remap both to match (C3) |
|
"Wrong Grease" |
The grease assigned to the point doesn't match the grease assigned to the Head Unit |
Stop. Check both in GreaseCloud (C4) |
|
Greasing shows as "00000000000000" or an unknown point |
Grease delivered without a matched tag read |
Work through Part D |
|
Untracked greasing on equipment with no tags |
No GreaseBoss tags at those points |
Expected — not a fault (D1) |
|
Untracked greasing at a tagged, mapped point |
Pumping started before the tag was read |
Wait for the point name and blue LED before pumping (D3) |
|
Tag missing from the point |
Lost through damage, retention failure or a nipple change |
Fit and map a replacement (Part E) |
|
Tag reads, point is on screen, but the point won't take grease |
The grease point itself |
Out of scope. Refer to your maintenance team. Don't pump against a blockage |
STILL NOT WORKING
Contact GreaseBoss Support with:
- Site, asset and grease point
- Head Unit serial number (e.g. GBHU2006XO) and firmware version
- The tag type fitted — Snap On, Button Head V-Tag or Washer Style
- The tag's RFID number if it is known, or the QR code shown on the Head Unit screen
- Whether the same Head Unit reads other points, and whether another Head Unit reads this point
- The result of the direct-read test at the base of the handle
- A photo of the tag in position on the machine, and of the fitting on the nipple
- A screenshot of the point in GreaseCloud showing the mapped RFID
Email: support@greaseboss.com.au